Unleashing Hyper-V on Windows 11 Home: Step-by-Step
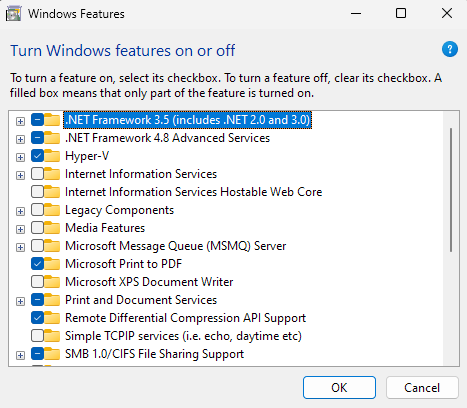
Enabling Hyper-V on a Windows 11 machine is pretty straightforward if you’re using the Pro version. You just need to search for “Turn windows features on or off” using the Start menu. Once in that window, you’ll see options as shown in picture below. Simply tick the Hyper-V feature, accept, restart your machine, and voilà!
However, if you have a Home edition license instead and follow the above steps, you won’t see the Hyper-V option at all. This is because that feature does not come out-of-the-box with such editions, and thus, some additional steps need to be taken.
Below, you’ll find a gist that you can save as a .bat file on your machine. Right-click it and run as administrator.
If you’re not really into batch files, OS commands, etc., don’t worry. I don’t want you to blindly execute scripts on your machine that you don’t really understand (Seriously! Never do that!). So, here’s a quick explanation of what it does, step by step:
-
pushd "%~dp0": This command changes the current directory to the one where the batch file is located. -
dir /b %SystemRoot%\servicing\Packages\*Hyper-V*.mum >hv.txt: This command lists all the.mumfiles in the systemPackagesdirectory, that have Hyper-V in their names. The/boption is used to get a bare format of the filename. All those package names are appended to a file namedhv.txt. -
for /f %%i in ('findstr /i . hv.txt 2^>nul') do dism /online /norestart /add-package:"%SystemRoot%\servicing\Packages\%%i": For each line we previously added to thehv.txtfile, we will now use DISM to add each package to the system image. The part between parentheses is used to ignore case and suppress error messages. -
del hv.txt: This command deletes thehv.txtfile created in the previous steps. -
Dism /online /enable-feature /featurename:Microsoft-Hyper-V -All /LimitAccess /ALL: This command enables the Microsoft-Hyper-V feature in the system image, preventing DISM from requesting the source files from Windows Update by using the/LimitAccessoption. -
pause: The last command pauses the execution of the batch file and waits for the user to press a key, allowing you to read the output of all the above commands before closing the window.
I hope this has proven useful for you. See you in the next post!